In this free course, we are going to create an online store with PrestaShop together step by step. There is a video version of this tutorial on our YouTube channel that we strongly recommend you to watch so you'll make sure you don't miss anything in installation progress:
Video guide:
I try to explain most things in enough detail but if you have any questions please feel free to leave a comment below. We will quickly answer.
First of all, what is PrestaShop?
It's an eCommerce solution. It's free and Open-source. It started in 2005 as a student project and the PrestaShop SA Company was founded in 2007. Since then 9 versions of PrestaShop have been released and the latest version is 1.7. Currently, 300,000+ merchants use PrestaShop for their online store worldwide. PrestaShop has been translated into 60 languages, and last but not the least, it has 300+ built-in features.
How much does it cost to start an online store with PrestaShop?
PrestaShop is 100 percent free. No monthly fees and no commission on your sales. The only cost to start an online store with PrestaShop is the cost of your domain name and the webserver.
Now you may ask how to start an online store with PrestaShop. If you are a merchant, there are more than 250 agencies around the world who can help you. And if you are a developer or internet savvy, go to PrestaShop download. This course is best designed for the latter.
If you have already started your online store with other eCommerce solutions, PrestaShop has made it easy to migrate from any script to PrestaShop. So don't you worry. There are several ways to do that. For example, if you are using WooCommerce there are solutions to migrate all your products, orders, customers, tax rules, address, etc. to PrestaShop.
What kind of businesses use PrestaShop?
Most kinds of online stores can use PrestaShop. If you sell physical products if you provide services or virtual products and also reservations you can do that with PrestaShop.
While using PrestaShop, you may need some help.
This course is here for you. Also, there are several other PrestaShop training available on the web, and there is the PrestaShop forum. And if you google your problem, most certainly you will find the solution.
Where should we download PrestaShop from?
Obviously from prestashop.com which we will do later in this video.
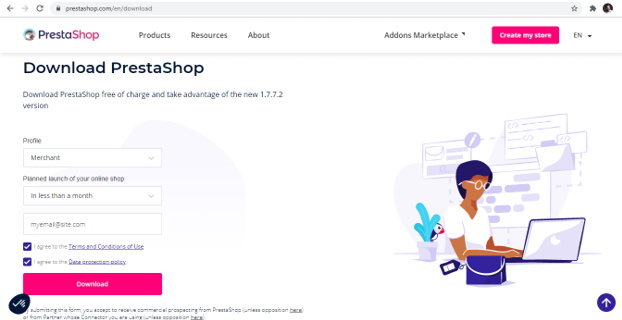
Image 1 - Download PrestaShop
What is PrestaShop Addons?
It's the official marketplace of PrestaShop. There are more than 6000 modules and themes available and some of them add some awesome features to your website.

Image 2 - PrestaShop Addons
What is a PrestaShop module?
It's a small plugin that adds some more features to your website to make PrestaShop easier to use and you can customize your website with it. Like payment modules, slider modules, mega menu modules, and so on.
What is a PrestaShop theme?
Basically, it's the look of your online store. You may have heard about two of the greatest and most feature-rich themes of PrestaShop. The Panda theme and the Transformer theme developed by sunnytoo.com. Later in this course, we will install and work with them so you can see all its great features. There are also some other themes for PrestaShop in known marketplaces such as templatemonster.com, themeforest.net, and also PrestaShop Addons.
Do you need to BUY any modules and themes to start your online store?
No, you don't need to. As I said before, PrestaShop has more than 300 free built-in modules and features and a customizable responsive theme.
PrestaShop by default has everything you need to start. From payment modules to marketing modules to start a professional online store.
Let's see some examples of stores run by PrestaShop.
There are websites in different categories using PrestaShop, you could go to prestashop.com and see the showcases there. There are also some showcases of Panda and Transformer themes which you can check it here.
Let's talk about SEO and how PrestaShop handles it.
As you know, SEO is short for search engine optimization. SEO is a set of rules to follow to have a better ranking in search engines, well mainly in Google.
Every script or web application should have some features so we can use them for SEO. Some scripts have these options built-in and by default like PrestaShop and some scripts need some plugins and addons to add these features to the script. By default, they are nonexistent like WordPress and WooCommerce.
Let me show you some of the PrestaShop SEO features. First of all the SEO tab of a product. As you can see besides the name field there are also a Meta title and Meta description field as well as a Friendly URL field. These are the very basic and necessary fields of a product for SEO. These fields are also available in categories, attributes & features, brands and suppliers, and static pages.

Image 3 - PrestaShop SEO features
The next one is the caching system of PrestaShop. It has some built-in features for caching which make the website perform better. We will cover all these options in the several next videos of this course.

Image 4 - PrestaShop caching system
Schema of the URLs is also a very handy and useful and built-in feature of PrestaShop. We'll get to that one too. Now you know a little bit more about PrestaShop.

Image 5 - PrestaShop URLs Schema
Let's start Installing and working with PrestaShop.
What you need to get started are a domain name and a web server.
A domain name is the public face of your store. So take your time, do your research and find a proper name for your store and register it via your preferred registrar. PrestaShop has some suggestions that you could see in doc.prestashop.com. I suggest that you ask your trusted experts about the best option.
For a webserver, we usually have 3 main options. Shared hosting, VPS, or dedicated server. For small-medium-sized businesses, especially at the very start, shared hosting is good enough. When it's time you will know to upgrade to a VPS or a dedicated server. These are the requirements to install PrestaShop on a webserver. You could take a screenshot or just copy this text from the video description and send it to your hosting.
System requirements
- System: Linux or Windows. Linux is highly recommended.
- Recommended Web server: Apache 2.2 or later.
- PHP 7.1 or later.
- MySQL 5.6 or later.
- memory_limit to "256M" or more
- upload_max_filesize to "16M" or more
- SSL certificate
- Must have PHP extensions: CURL, DOM, Fileinfo, GD, Intl, Mbstring, Zip, Json, iconv
- To improve performances: MemCached, Apcu, OpCache
While working with PrestaShop (and any other scripts) you will need some tools. Mainly a text editor which you can see a list here but it's not limited to this list:
- Sublime Text
- Atom
- Vim
- Emacs
- DO NOT use word processor (MS WORD or OpenOffice.org’s Write)
Sublime Text and Notepad++ are my choices in Windows. Remember NOT to use a word processor when editing text files, such as Microsoft Word or OpenOffice.org's Write.
Also, an FTP client would come in handy. Here is a list and WinSCP is free open-source software that is my favorite:
- WinSCP
- CoreFTP
- Cyberduck
- gFTP
Where to install PrestaShop
Lastly, we need to decide where we want to host PrestaShop. There are four possibilities relating to our domain name:
- At the root of the domain. Like example.com
- In a folder like example.com/shop
- In a sub-domain like store.example.com
- And in a folder of a sub-domain like clothes.example.com/boutique
It defers from business to business. The most used one is the first one. At the root of the domain. But there are conditions where you need to choose one of the other possibilities above. When you decided what's best for you, you are ready to install PrestaShop.
Installing PrestaShop
These are the 7 steps we need to take to install PrestaShop.
- Download and unzip the PrestaShop package.
- Upload the PrestaShop files to the chosen location on your web server.
- Create a database for PrestaShop and a user who has all privileges for accessing and modifying this database.
- Run the PrestaShop installation script by accessing the public URL for the chosen location in a web browser.
- Follow the instructions on each screen of the installer.
- Once the installation is done, delete the /install folder
- Write down the new name of the /admin folder
Are you ready? Enough theory, let's get to work.
Step 1: Download and unzip PrestaShop.

Image 6 - Download PrestaShop
Go to prestashop.com and click on the "Create my store" button. You could check the boxes and click download, it will start downloading the latest version like this:
Instead of this, I prefer to go to All Versions and see all available versions for myself. If you click on download on the previous page, you will always get the latest STABLE version. As you can see there are several types of PrestaShop releases. Alpha, Beta, RC (or release candidate), and stable. You should only use the stable versions on your production sites. Other types are for testing and bug-reporting purposes only.

Image 7 - Download the stable version
On this page, you could also see the release date of every version. The changelog and release note of that version. Click on the download button in front of the version you want and download it to your system.
Step 2: Upload the files
You need to unzip the package and delete the Install_PrestaShop.html file. We don't need it.

Image 8 - Upload "prestashop.zip" and "index.php" files
Now we need to upload these 2 files prestashop.zip and index.php to our webserver. You should go to your hosting panel and enter your username and password which the hosting company provides for you.
Here is a screenshot of CPanel. There are some other panels too which are similar to this one with a different interface.

Image 9 - File manager in CPanel
Go to file manager > public_html. Click on upload and then Select files > and select prestashop.zip and Open. Again click on select files and select index.php > Open and wait for both files to upload. When the progress bar turns green it means upload is done.

Image 10 - Upload done
Click on "Go back to public_html". You should see both files here uploaded. If you see any other files here, just select them and click on delete here. Now we could start the installation by typing our domain in another tab in the browser. This was for the first method. The root of the domain.

Image 11 - Installing PrestaShop in root
Installing PrestaShop in a subfolder
If you want to install PrestaShop in a subfolder you should create a folder here like the following image. Click on "Folder" in top bar. Type a name like "shop" and hit the "create new folder" button. Then upload or move PrestaShop files to that folder.

Image 12 - Installing PrestaShop in a subfolder
Installing PrestaShop on a subdomain
If you want to install PrestaShop on a subdomain go back to your panel and look for "subdomains". Click on that and type your preferred subdomain like "store" and click on create.

Image 13 - Installing PrestaShop on a subdomain
Now go back to file manager > public_html and you will see a folder with the same name of your subdomain. Just upload or move PrestaShop files to that folder and you can install PrestaShop on that subdomain.
Installing PrestaShop in the subfolder of a subdomain
And if you want a folder in a subdomain just create a subdomain. Then go to that subdomain and create a folder inside that. Then upload or move PrestaShop files there and start installing.

Image 14 - Installing PrestaShop in the subfolder of a subdomain
We are going to install PrestaShop on the root of our domain. So we don't need any of these folders.
Step 3: Create a database
Before installing PrestaShop, we need to create a Database. To do this, go back to your cPanel, type "MySQL" in the search bar, and click on "MySQL® Databases".

Image 15 - Creating a database
Choose a name for your database and click "Create Database". Copy your database name and paste it into your notepad.

Image 16 - Database name
once you get the success message, Go back to the previous page, scroll down to the "Add New User" section and choose a name for your database user. you need to enter a password as well, I suggest you use the "Password Generator" and make sure to copy the database user name and password into the notepad.
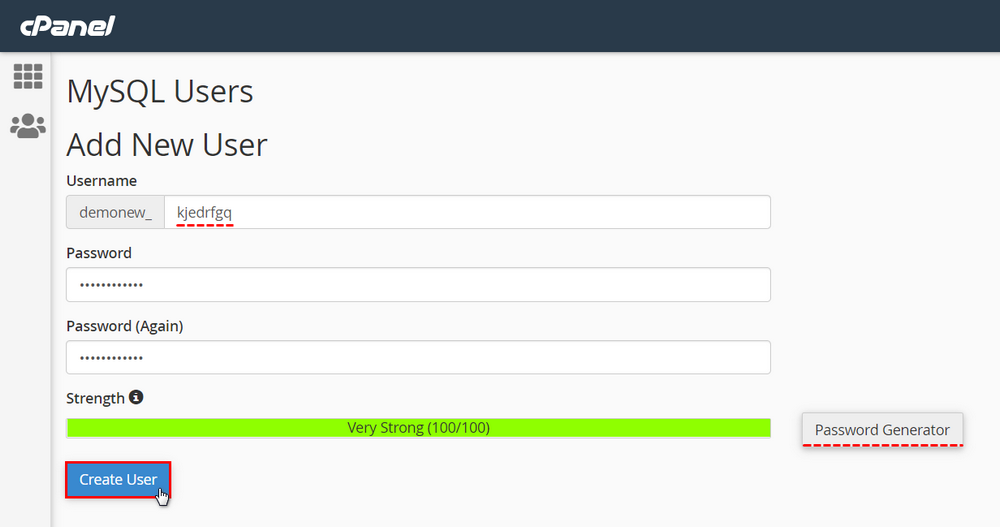
Image 17 - Database user
Now we need to create access to the database for this user. Scroll down to the "Add User To Database" section and add the user to the database

Image 18 - Add user to database
On this new page, Check "ALL PRIVILEGES" and click Make Changes. Click on the "Go back" link, and we are ready to install the PrestaShop.

Image 19 - Give all privileges
Step 4: PrestaShop installation script
Let's start PrestaShop installation. I type our domain here in the browser and hit enter. First, it starts unzipping the prestashop.zip file, and then the installation begins.

Image 20 - PrestaShop installation script
Step 5: Follow the instructions
We are going to follow the instructions on each screen of the installer.

Image 21 - Choose language
1. Choose your language
2. Click Next

Image 22 - Accept PrestaShop's licenses
3. Read PrestaShop's licenses and check the "I agree to the above terms and conditions"
4. Click Next
Shop informations
If you see the following page, it means everything is OK with your server configuration, if anything goes wrong, you'll see the exact problem(s) which you can contact your server support to solve the problem.

Image 23 - Shop informations
5. Choose your Shop name. Do not use a colon in your store's name.
6. Indicate your main shop activity.
7. You have the option to import demo products; this is a good help to understand how PrestaShop works.
8. You can change the country and timezone.
9. Indicate the personal information for the shop owner.
10. Choose the Email to log in to the administration panel of your shop, this will be your super admin account of the shop and can't be deleted.
11. Choose a strong password.
12. Click Next
Database informations
Now you have to fill all the fields with the database connection information

Image 24 - Database informations
13. Leave "Database server address" field be the default address, if you had a connection problem, you can change it to "localhost".
14. Your "Database name" which you created in Step 3.
15. Your "Database username".
16. Password of the above username.
17. Leave "Tables prefix" field to be "ps_".
18. By clicking the "Drop existing tables" box, if you had any content on that database, they will be deleted, keep this box checked to make sure we have a clean install.
19. Click on the "Test your database connection now!" button in order to check that you used the correct information.
20. Click Next
This is the last installation step, it might take a few minutes: please be patient and do not touch your browser!

Image 25 - Installation in progress
Your installation is finished but you have to delete some folders to complete it.

Image 26 - Installation is done
21. You can click on the "Manage your store", so your admin folder will be changed to a random name, after clicking this button, you will see a message to delete the install folder, which we'll do in the next step.
Step 6: Delete the install folder
Once the installation is done, delete the /install folder in the root of PrestaShop.

Image 27 - Install folder
Step 7: Name of the admin folder
If you clicked the "Manage your store" button in the last step, PrestaShop will choose a random name like admin××× for you. You can change the "admin" folder to a custom name like "4dmin-1537" or "MySecReT4dm1n".

Image 28 - Admin folder
Step 8: Log in to admin panel
Go back to the admin directory of your shop (domain.com/YourAdminFolder) and Log in with the Email and Password you used while installation.

Image 29 - Login to Admin Panel
Make sure to check the "Stay logged in" every time you log in to your PrestaShop, unless you don't want to say logged in. If you don't check this box and login and start creating a product, which will take several minutes to make, by clicking the save button at the end you'll be logged out and all your changes will be lost. So make sure to check it before logging in.
Admin panel
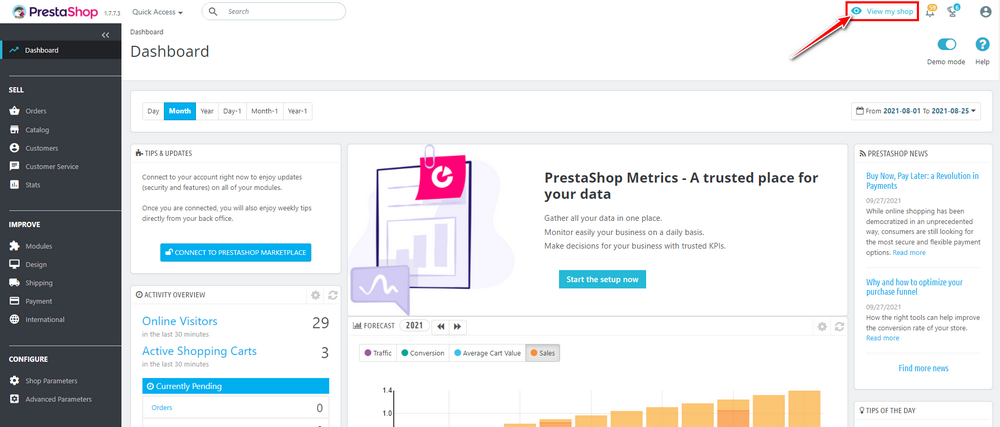
Image 30 - PrestaShop dashboard
Here is our PrestaShop dashboard. By clicking on "View my shop" you can see the front office.
That's it. Now you know PrestaShop and know how to download and install it on a webserver. Go ahead and install a PrestaShop of your own and read our next tutorials to learn more about the Admin panel and every option and feature. The next tutorial is "Discovering the Admin Panel of PrestaShop". Everything you need to know about the PrestaShop back office.


