Video guide:
Why should we delete the demo data?
As we mentioned in previous tutorials, the demo data only use is to help us understand and see the structure of a real store created by PrestaShop. So when we are going to start our shop, the first step is to delete all the demo data and set up our own content.
What is demo data?
- Catalog (Products, Categories, Brands, Suppliers, Attributes, Features, …)
- Orders (Orders, Shopping Carts)
- Customers (Customers, addresses)
- Customer Service
- Shipping (Carriers)
- Static Pages
- Stores
- Banners, Sliders, Texts
How to delete demo data?
Earlier there was a default PrestaShop module named Database Cleaner or PrestaShop Cleaner. Using This module we could clean the demo data from our shop.
But on March 2021, PrestaShop announced that they have abandoned several modules, and Database Cleaner (PrestaShop Cleaner) is one of them. So right now all of them are archived. Because they want to focus on more important modules.

Image 1 - Abandoned Modules
Since then, we have the option not to install the demo data in the installation process of PrestaShop which I suggest you do. Just select "No" as it's shown in the following screenshot.
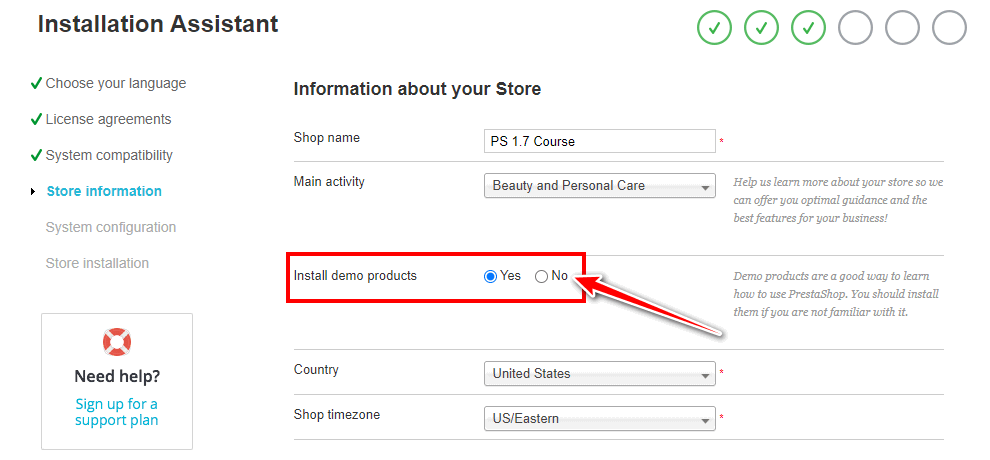
Image 2 - Install the demo data
But if we installed the demo products, we need to delete them manually or with the archived module (I mean the abandoned one.)
Demo Orders
The only problem with deleting demo content manually is that PrestaShop does not let you delete orders and payments because it's illegal in some countries and if PrestaShop had this option it would render PrestaShop illegal in those countries.
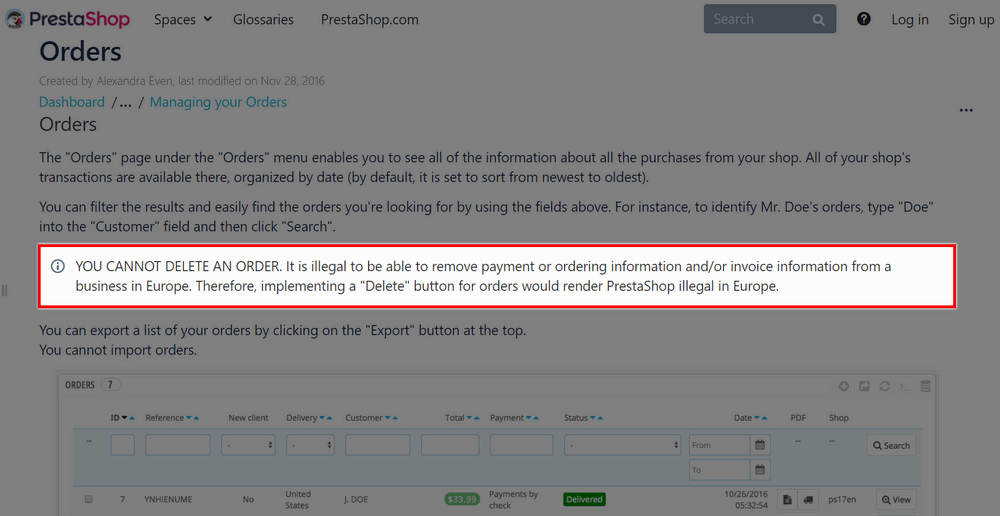
Image 3 - Delete orders
So to delete the demo orders, we have 3 options:
- Using a module
- With query via database (Not recommended though, as there are several tables containing information of an order)
- Just canceling the orders (Not recommended)
Database Cleaner module
We are going to download and use the Database Cleaner module to see if it works. You can find the module in this page or go ahead and google "pscleaner prestashop". Most probably the first link is the official GitHub page of this module.

Image 4 - Find the GitHub link
Double-check to make sure it is the official PrestaShop GitHub repository. As you can see this module has been archived and it's no longer maintained.

Image 5 - PrestaShop GitHub repository
Download a module from GitHub
To download this module or any other module from GitHub, you need to follow these steps:
1. Download the ZIP file

Image 6 - Download the ZIP file
Click the "Code" button and then Download ZIP to your system.
2. Unzip the ZIP file
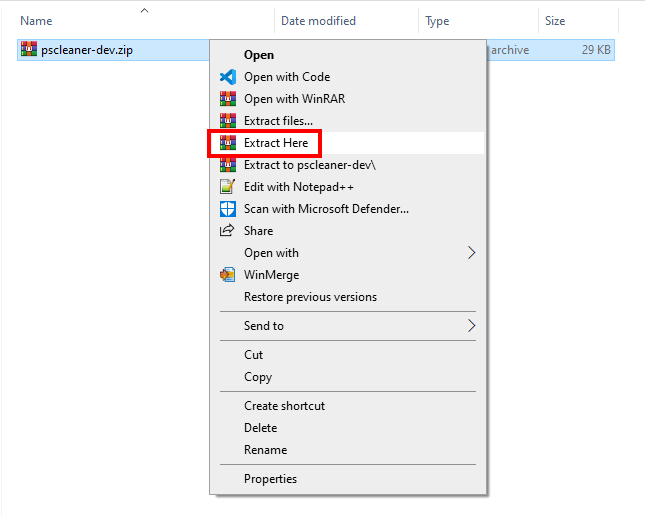
Image 7 - Unzip the ZIP file
Unzip this file. Go inside the "pscleaner-dev" folder and find the module's main PHP file. This folder's name must match this PHP file. It's "pscleaner" in this case.
3. Rename the folder
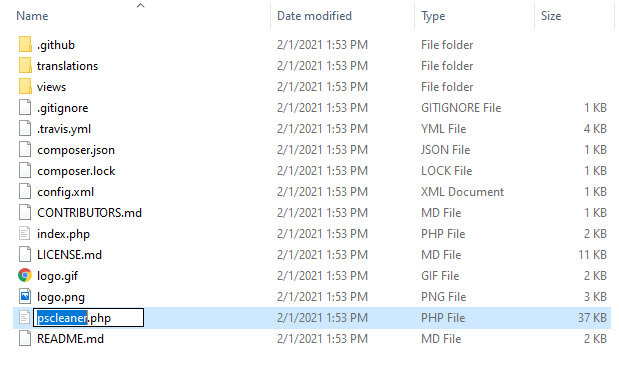
Image 8 - Find the main PHP file
Click on rename and copy the php file name. Go back to change the folder name. Here you see a hyphen dev that is extra and needs to be deleted. To be safe, click on rename and paste.
4. Check the folder and file names

Image 9 - Rename the folder
Now the folder and the main PHP file of the module have the exact same name.
5. Zip the folder

Image 10 - Zip the pscleaner folder
It's time to ZIP the "pscleaner" folder and then install it on PrestaShop.
The zip file should look like the following screenshot. A folder called "pscleaner" and inside that folder, its files.
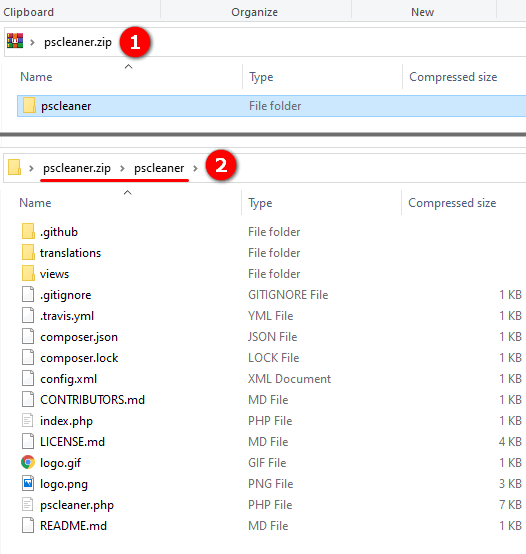
Image 11 - Inside the zip file
Install a module in PrestaShop

Image 12 - Module Manager
To install a module in PrestaShop 1.7 go to "Modules > Module Manager".
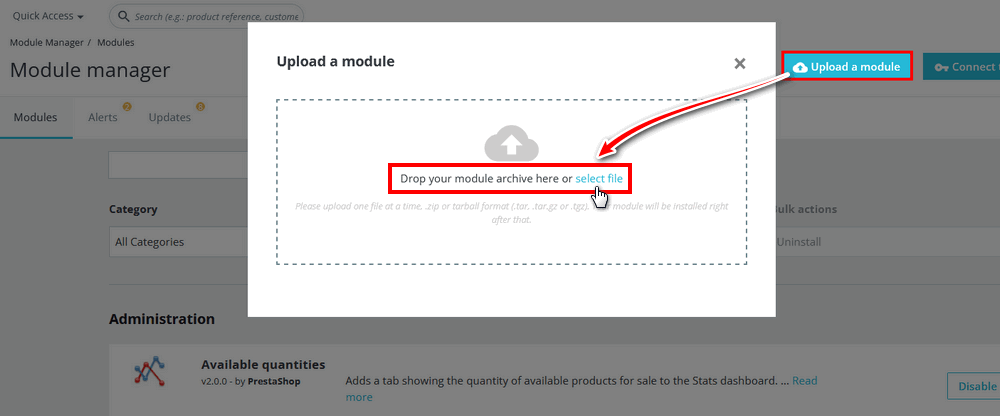
Image 13 - Upload the zip file
On the top right corner click "Upload a module > Select file" and after selecting the module's file, click open.
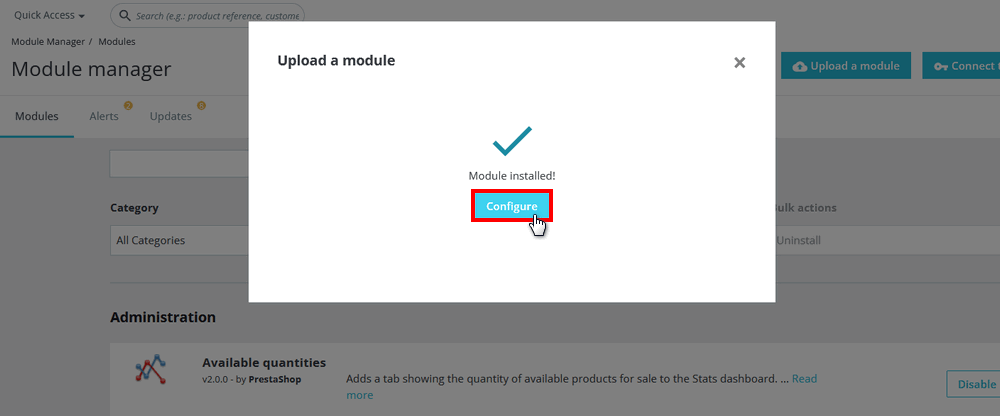
Image 14 - Configure the module
When the module is installed click configure.
configure the module
This module has 4 options. Be really careful with this tool. There is no possible rollback after using these options.

Image 15 - Delete catalog
Delete catalog: The first one is to delete the catalog. Read the highlighted box first. Products, categories, brands, images, prices everything related to the catalog will be removed from your database permanently. So only use this for demo data. Change this to "Yes" and click Delete Catalog. Once you click ok, the catalog should be cleaned.
Let's check the catalog before we use this option. As you can see in the following screenshot, We have some products, categories, attributes and features, and brands.

Image 16 - Before deleting catalog
Go back to module settings, click on Delete catalog and then click ok. We should receive a message saying "Catalog truncated". Let's see if it's true.

Image 17 - After deleting catalog
That's great. The catalog is clean now.

Image 18 - Delete catalog
Delete orders & Customers: The next option is to delete orders and customers. Read highlighted box and then select "Yes" then click on "Delete orders & Customers".
Before we do that let's check orders and customers. We have orders, customers, and addresses as it's shown in the following screenshot.

Image 19 - Before deleting orders & Customers
Go back to module, before you click the "Delete orders & customers" remember that there is no confirmation for this one, so be careful. Let's check if the orders and customers are cleaned.

Image 20 - After deleting orders & Customers
Orders and customers are cleaned, so this module still works in 1.7.7.3

Image 21 - Clean & optimize
At the end click the "Check & fix" button to refine your database integrity constraints. And Click the "Clean & optimize" button to reorganize the physical storage of table data and associated index data, to reduce storage space and improve I/O efficiency when accessing the tables.
Carriers and contents
So far we have cleaned orders, catalog, customers, and customer service. We still need to delete carriers and stores and modify the Static pages, the banner, slide show, text block, menu and the footer.

Image 22 - Deleting default carriers
Deleting default carriers: To delete default carriers, go to shipping > carriers. Bulk actions > select all. Again bulk action > delete selected > ok. Done.

Image 23 - Deleting default stores
Deleting default stores: To delete stores, go to "Shop parameters > Contact". Click the "Stores" tab. Here you see a stores information. Name, address, location, picture, and working hours. To delete them, click the "Bulk action > Select all". Again "Bulk action > Delete selected > Ok".

Image 24 - Modifying contents
Modifying contents: There are those contents that need to be modified mostly not deleted. The static pages, the banner, slide show, text block, the menu, and the footer. We will talk about these in separate videos.
We are done cleaning the demo data after installing PrestaShop.


