
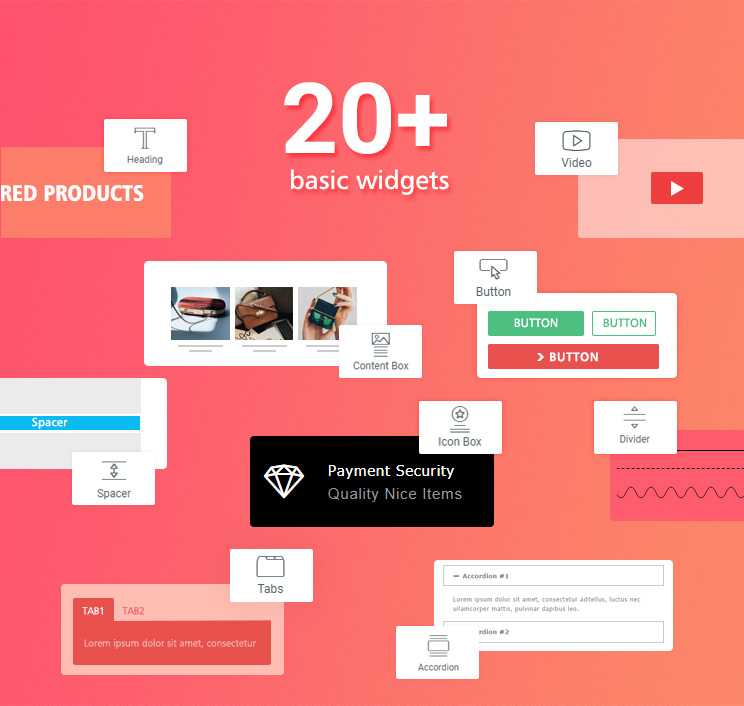
Description
Easybuilder
Easybuilder is a visual website builder for PrestaShop specific to the Transformer theme v4 and Panda theme v2, it has two key features: 1) Frontend content editor. 2) Frontend theme editor. The frontend content editor enables the ability to create complex impressive pages visually, the frontend theme editor enables the ability to design live. With the easybilder module, anyone can build impressive PrestaShop websites, even if you're not a professional nor have any experience with site building.

Demo back office
A demo for everyone, do whatever changes you like, your changes may be erased when you close the browser window.

Pre-made demo pages


Plugins for EB

Easymenu - Drag & drop mega menu builder module for PrestaShop
Megamenu builder module for PrestaShop. Drag & drop various menu elements to the menu using the front-end editor, that's how easy it's to create a menu with the Easymenu module.
Catalog
2. Front-end theme editor.
Preview almost all your simultaneously without reloading the preview window.
Front-end content builder.
Based on the latest elementor.
Based on the latest version of elementor (v3.x.x), we will keep upgrading the easybuilder module along with the elementor module to get all new features and bug fixes.

What's elementor.
Elementor is the World's Leading WordPress Website Builder, check out its official site Elementor. It has two versions: Basic (free) and Pro. Easybuilder is based on the basic version.
Has all needed features of the elementor.
Easybuilder has all needed features of the basic version of Elementor, check a full list of on this page Elementor Features (Note features with a "pro" budge don't count). As you can see there are a lot, we will highlight some interesting ones out here.
Live design
Edit the site live, and see exactly how it looks like.
Navigator
Navigate between all page elements or layers, quickly glance custom changes and easily access them via indicators.

Responsive Editing
Switch to mobile view, and tweak every element to make it look perfect on any device.

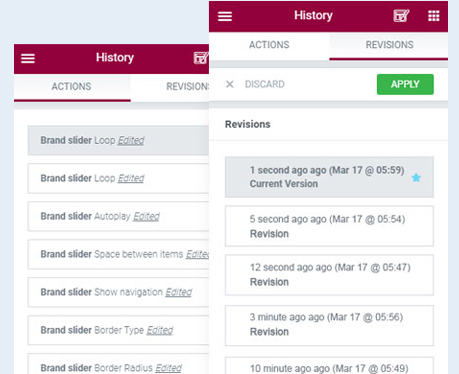
Revision History
With Revision History, your entire page creation process is saved and can be easily re-traced.
Shape Dividers
Add striking shapes to separate the sections of your page.

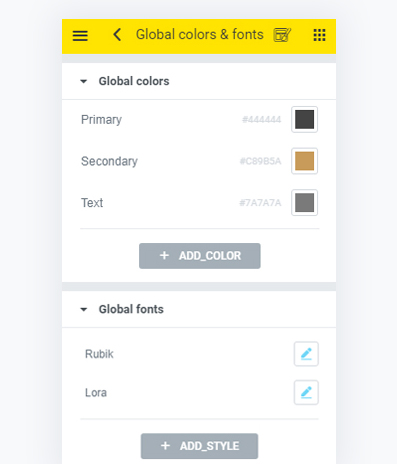
Global Fonts & Global Colors
Set your choices for all fonts and colors on your site.
Copy Paste
Quickly copy any element and paste it to a different place on the page, or to an entirely different page on your site.
Copy Style
Copy the entire styling from a widget, column or section and paste it to another element with a click.

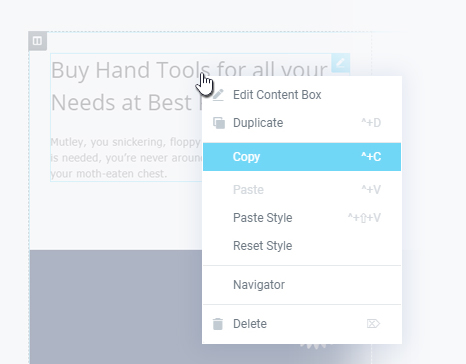
Context menu
All editing controls in the new context menu.
Entrance Animations
Add entrance animations for your widgets to appear. Check this Easybuilder entrance animations demo.

Gradient Backgrounds
You can have colorful gradient backgrounds for any blocks.
In-line Editing
Use the in-line editing feature to type directly on-screen, and make blog post and content writing an easy and intuitive process.
Responsive Sizing
Change the size per device.
Template library
Import a wide array of beautifully pre-designed sections and pages to your site.

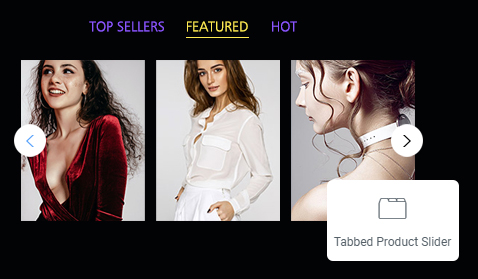


Product slider widget
Use the Product slider widget as an example to show how powerful those widgets are.
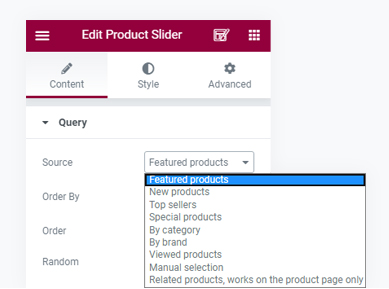
8 Ways of getting products
- Featured products
- New products
- Top sellers
- Special products
- By category
- By brand
- Viewed products
- Manual selection

5 Ways of displaying products
- Slider
- Grid view
- Simple layout
- Simple multi-row slider
- Single item slider
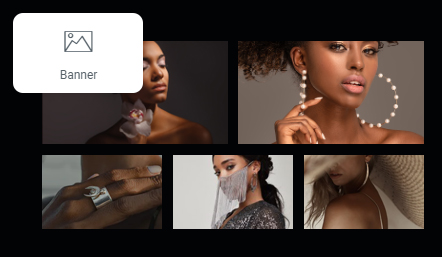
Various design options.
- 3 ways to display images: 1) Display the cover images only. 2) Display all images in a slider. 3)Display all images in a slider with thumbnails below.
- Custom heading and sub heading.
- 2 ways to set the number of slides per view when in slider mode: 1) Auto slides per view. 2) Manually set the number of slides per view.
- Use different image types in different blocks to assure images look extremely sharp.
- Lazy loading.
Compatible with almost all other modules
Most 3rd party modules are compatible with in the easybuilder. Add them to the "PrestaShop modules" widget, and then drag and drop to place them to anywhere you want.
Header widgets
It's possible to add content to the NavFullWidth hook as the header of your site, add content to the FooterBefore hook as the footer of your site.

There are 3 header widgets, use them in the NavFullWidth only. The major difference with other widgets is that header widgets will be displayed side by side by default, not the default way one after another.
The "header modules" widget is the most important one, it's used to display items like "Shopping cart", "Search box" in the header. To customize items added by this widget, use the setting under the "Modules" tab in the front-end theme editor panel.
Unlimited header layout
Creating a unique header is easy & fast with the easybuilder module.

Footer widgets
There are 2 footer widgets, use them in the FooterBefore only. The major difference is that footer widgets will be collapsed on mobile by default.
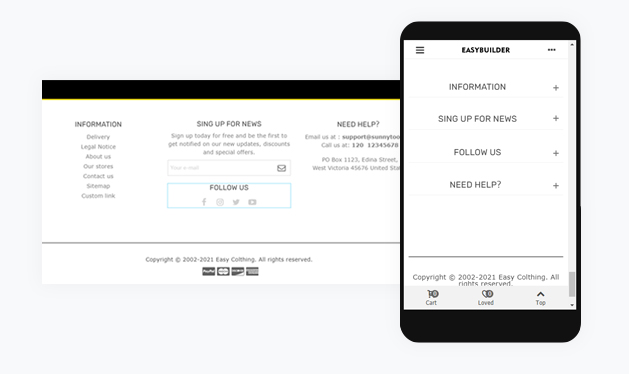
Unlimited footer layout
Creating a unique footer is easy & fast with the easybuilder module.

Add content to hooks.
Easybuilder can add as much content as you need to any hooks. All you need to do to create a homepage is putting content to hooks located on the homepage. Here are some most used hooks:
- Full width top (Homepage):It's recommended to use this hook to create the homepage.
- NavFullWidth:If you want to create a header using the easybuilder, then use this hook.
- FooterBefore:If you want to create a footer using the easybuilder, then use this hook.
- Order confirmation page:This hook and several others hooks on the checkout page are special, because it's not possible to access to pages where those hooks are located, so an empty page will be used instead for you to edit & preview the content.

Create product descriptions.
Create beautiful content with the easybuilder module, beside creating product descriptions, the Easybuilder can also be used to create:
- Product summarys.
- Cms pages.
- Category descriptions.
- Brand descriptions.
- Blog posts
Add content conditionally.
Creating the same content for some products one by one is a wasting of time. With this feature, you just need to create the content for once, and then assign it to some products at once. You have 3 options:
- By category.
- By brand.
- Manually section.
You can do the same to several other places like, "Category page header", "Product right column", "CMS pages", etc.

Quick switch.

When you finish creating content for a product, you want to continue to create content for another product, generally, you need to go back to the back office to find the product on the "Catalog > Products" page, and then click on the "Edit" button on the back office product page. With the quick switch feature, things are more easier, all you need to do is to serach and select the product on the quick switch panel, no need to go back to the BO, even no need to refresh the editor page.
Quick switch without reloading the page
How easy & fast it is to switch from editing the homepage to editing a product description.
Front-end theme editor.
Theme editor
Adjust theme settings on the left side, view almost all changes simultaneously on the right side prview window.
If you have experience of using Transformer theme and Panda theme, then the front-end theme editor is pretty much the same as the back end one functionally, the major difference is that almost all changes can be previewed simultaneously, only a few (less than 10) will be reflected in the preview only after the page reloads.
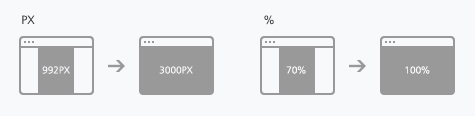
Page width
Any number between (992px, 3000px) or (70%, 100%).
Switch the preview page
How easy & fast it is to switch from editing the homepage to adjust the product page layout.

Adjust the product page design
Adjust the product page layout on the frontend theme editor panel.
Adjust the category page design
Adjust the number of products per row, show/hide the category description, enable/disable the "Read more" button, all can easily be done on the frontend theme editor panel.
Customize header modules
You can adjust the design of header items like "Shopping cart", "Search box" under the "Modules" tab on the theme editor panel.

Transplant modules
Easybuilder can be used to create the header, if you prefer the native PrestaShop way by transplanting modules to hooks like displayTop and displayNav, then you can use the "Hooks" tab to adjust the header design by moving header modules from one hook to another and changing the sort order of them.
3. Other features.
Multi-language
This module is fully translatable, check #40 in the documentation section to know more about translation.

- Compatible with the Multistore feature, all demos were built with the multistore feature.
- Work fine with sites having a large amount of products and categories.
- Simple installation, no override files.
Compatibility.
- Prestashop1.7.5+
- Transformer theme v4 (v4.5.1+) and Panda theme v2 (v2.6.1+). Doesn't work on any other themes.
- Comaptible with most 3rd party modules, not compatible with the Visual composer module.
- PHP7+
Tips.
The navigator panel is very useful tool to manage elements, use it often.
2. Use negative margins with caution.
To have an asymmetrical layout by setting a negative margin is awesome, generally, only use negative margins for layout purposes. Never use negative margins to reduce gaps, there are other proper ways to reduce gaps between elements.

z-index is used to adjust the stack order of elements, it's recommended to use small values, like 1, 2, 3.
Using absolute position can create some nice effects, but use it properly is not easy. Not recommended for beginners.
Setting some global colors and fonts is a very nice way to keep colors and fonts well organized on your site.
6. Copy/remove all content.
Right click on the add-new-section to see buttons of copying/removing all content.

7. Set background opacity to 0.
If you can't find a button to remove a background, then setting its opacity to 0 can remove the background. The same as setting the border to 0 or transparent to remove a border.

A category can have 3 images "Category cover", "Category thumbnail", "Menu thumbnail". Till 1.7.7.1, the category thumbnail is buggy, don't use it. A category cover in most cases is a rectangle image that used to be displayed on the top of the category page. So if you want to have a square category image on the homepage by using the category slider widget, then it's recommended to upload a menu thumbnail for every category.
9. Use VW for large text.
VW: A percentage of the full viewport width. 10vw will resolve to 10% of the current viewport width. It's recommended to use VW for large texts, they will automatically become small on small screen devices. If a text is too small on mobile, then specifically set a large value for mobile devices.

10. Use % for large spacings
If you set a 200px spacing, it's okay on desktop, but on mobile, it's nearly half of view width. So it's recommended to use values like 10%, which works fine on all devices.

If you want to set the text color to be white for all widgets in a row, you can set the text color in every widget. Another better solution is to set the text color in the row's setting panel, the setting will be applied to all widgets in the row.
Use it only when you want to add multiple paragraphs to your site, the text editor widget wraps content in p tags by default, a p tag has a default bottom margin which makes trouble in some cases. For short text, use the Heading widget instead.
You can find a list of modules of the Transformer theme and Panda theme on the "BO > Improve > Easy builder > Easy builder settings" page, the easybuilder has all features of those modules.
NOTE 1 Disabling modules first is recommended. You will lose content created by those modules if you uninstall them. Uninstall them when you are sure content created by them will not be used anymore.
NOTE 2 Those modules can be disabled or uninstalled but don't remove their files.
If you have difficulty dragging a widget up, then you can use the hover-show-out pen editing button as a drag handler.
If you are going to create a block that contains two or more of these items: Image, Heading, Subheading, Text and Button, then it's recommended to use the "Content box" widget to create it instead of using an image widget + 2 heading widgets + a text editor widget + a button widget.
Enable CCC is recommended when in development and production. The easybuider page loads a lot CSS and JS files, enable CCC to merge them into one file can improve the performance.
17. How to create a block like this

This block is composed by two colums, the left column contains an image, the right column overlaps on the left colum, here are some key points to create a block like that:
- Set the "Vertical Align" setting of the section to "Middle", the content in the right column will be on the middle part.
- Set a background to the right column, adjust it's margins, note the left margin is negative.
- Switch to "Mobile < 768" view.
- You would find that the right column is under the image, which isn't nice, enable the section's "Reverse Columns (Mobile)" setting to reverse the position of columns on mobile.
- Set a top padding and a bottom padding for the right column to add some spaces between the image and the text.
- Adjust the margins for the right column to make it display fine on mobile, it's recommend to set a left margin, a right margin and a negative bottom margin to have a similar layout as on desktop.
Note You can easy get this block by importing it from the template library.


The key potings to have a fully click banner or slide are:
- Fill in the link field.
- Empty the button text field.
Sliders created by the Revolution slider have a 30 bottom margin by default, use the "Margin Bottom" filed under the "Position" tab in the "Layout & Visual" section in the revolution slider moudle to set it to 0.
Documentation & FAQ.
You can, but most of your changes will not take effect anymore. So once you install the easybuilder module, use its front-end theme editor panel to adjust theme settings.
. If you are going to create a record from all languages with the same layout, then leave the language field be empty to make the record show for all languages. There is a language switcher along with every text field, use them to enter different content for different languages.
. If you are going to create a record for a specific language, then select a specific language in the "Language" field. The record only shows in the selected language. The advantage of this way is that you can have different layouts for different languages.
You might be confused by the Multilanguage feature and the "language switcher", we will soon create a video to explain them. Check #53 to know more about the "language switcher".
Yes, those two themes are already good enough, they can work perfectly fine without using this module. It's recommended to use the easybuilder module with them, because the easybuilder improves those them to make them be even better.
4. How to omit the gap between columns?
Use the "Columns Gap" setting in their parent section setting panel (Use the navigator to easily locate the parent section). The "Columns Gap" setting can also be used the omit the gap between sections.

5. How to omit the gap between widgets?
Use the "Widgets Space" setting in the their parent column setting panel (Use the navigator to easily locate the parent column).


6. [Header] Which widgets can I use in the header?
All. The key point is to set the "Width" setting to "Inline" in the "Positioning" section under the "Advanced" tab of the widget, so widgets will be displayed side by side.
1) Simply drag and drop if they are small. 2) Drag to sort them in the navigator panel.
Don't worry, it's a trend of websites to use more and more js files, there are already have sites that were built with 100% js. Instead of putting too much attention on js files, putting your attention on optimizing image files, image files are way larger than js files. The front office of a PrestaShop site can be in pure Js, we are waiting for that day, the biggest obstacle is module compatibility I guess.
All suggestions given by those tools are right, but most of them are useless, take those suggestions as suggestions, no need to apply them no matter what costs. They give out suggestions based on a 100 perfect program condition, but they forget that easy-to-use and customizable is also important. We will soon create a post to explain more.

10. How to create the header using the easybuilder.
Create the header use the NavFullWidth hook. It's important to hide the default header by using the "Hide the default header" setting on the "Theme editor > Header" panel.
Use the FooterBefore hook. Remove all content from these hooks ( "StackedFooter*", "displayFooter" and "displayFooterAfter" ), then the default footer will disappear.
12. How to align widgets vertically.
Use the "Vertical Align" setting in the parent column setting panel.

You can use as many as you want, but it's recommended to use as few fonts as possible. The URL to load Google fonts looks very long, but don't worry, only fonts, which are going to be used, will be loaded.
Some hidden settings will not take effect in the editor, otherwise, you will not be able to see & edit those hidden elements.
Hooks like "displayMyAccountDashboard" and "displayOrderConfirmation2" are located on pages that can't be accessed, when you try to add content to them, you will be redirected to an empty page to create the content there. The content you created will be displayed correctly in those hooks.
16. Inner section widget.
An innser section contains two colmns by default. Right click on the section to add more columns if you want.

When you select 25,25,50, you may get 25,50,25, when that happens, select a structure that gives you the expected layout on the preview window. The issue might be fixed in the future, the reason is that newly added columns got added to the middle, not the end.
18. Reverse Columns.
Columns on the right will be on the bottom of other columns on mobile, if you want to reverse that, use the "Reverse Columns" setting in the "Responsive" section under the "Advanced" tab on the "Section" setting panel.

Be careful when you copy-paste text from Word or perhaps a website, text formatting will be copied too. In most cases, the text formatting is a trouble maker, remove text formatting before pasting the text to the inline editor and text editor. The simplest way is to paste the text to the browser address bar, and then copy it again, by doing that, the text formatting will be removed.
Design
- Shape Divider
- How To Place Widgets Side By Side In The Same Column
- How to Use Z-Index in Elementor
- Mobile Responsive Editing
- Gradient Background
- Section/Column Vertical and Horizontal Alignment
- How to Use Minus Margin
- How to Add & Edit a Background Video in Elementor
- Hover Effects
- Entrance Animations
- Background Slideshow
Editor
Currently no, it can work with our Transformer theme and Panda theme. Why? With other themes, what the easybuilder can do is limited, it would be just a content builder, but with our feature-rich themes, it becomes way more powerful to have the ability to set up the entire site. Compatibility is also a big concern. By using the easybuilder with our theme, you will have a compatibility issue-free experience.
Go to the "Theme editor > Hooks" panel in the theme editor panel to remove all modules from these hooks: displayNav1, displayNav2 and displayNav3
23. [Header] Multi rows in the header.
The spacer widget can be used to separate header widgets from one row to multiple rows. You might need to adjust the parent column's "Widgets Space" setting to adjust spacings between rows.

That's normal, empty spacings may show on these areas: 1) Under the header. 2) At the bottom of the page. Let's use the footer as an example to explain the reason. If you remove all modules from the footer, then it will not be displayed on the live page, but on the preview window, the footer will still be displayed out, in case you want to add something back to it.
You can have a customized column structure, like "22,78", the structure will be applied on mobile too by default, in most case, that's not nice, so you need to adjust the width for mobile. Not like the default column structures, they will automatically stretch their columns to 100% in width on mobile, customized structures don't do that.
26. [Header] Reverse the direction of dropdown menus in the NavFullWidth hook.
When you use the easybuilder module to create a header, then you may want to change the directon of dropdown menus in the right side column. To do that, just add this "dropdown_in_right" to the column's "CSS Classes" field.

You will stop getting updates of the easybuilder module, that's all. Even if you don't renew the license, the module will still work perfectly fine on your site till forever.
It's recommended to keep both your theme and your easybuilder module up-to-date. If any of them is too old, like hasn't been updated for 1 year, then they may not work along with each other.
If your menu doesn't have a background, then you might need to put this code to the custom css code field to get rid of the left side spacing of the menu.
1 | #st_header .st_mega_menu li:first-child a {padding-left: 0;} |
The banner widget and the swiper widget allow us to upload images for mobile devices, those images won't show out on the right-side preview window. Use a real mobile device or use chrome's developer tools to preview them.
https://www.fluttericon.com/ is an custom icons generator, check this tutorial to know how to add more icons to your easybuilder.
How to add new web font icons.
Two ways to add content to a cms page. If you add content directly to a cms page, then the content can't be in fullwidth. Another way is to add content to the cms page hook, in this way, the content can be fullwidth.
Reload the page again. If the problem persists, view the front office of the page to see if it's displayed fine. The most common errors are: 1) For a cms page, its "Displayed" setting is off. 2) For a hook, the hook not displayed on the front office.
If you get the error when editing the homepage, then check the "index" record on the "Shop parameters > Traffic & SEO" page, if it has a "Friendly url", empty it.
Probably not, if the easybuilder gets used properly, front pages created by the easybuilder are light and fast. For example, to create a nice homepage, you might need to use 10 different modules, but with the easybuidler, you can disable those 10 modules to create the same page by using the easybuilder only. The easybuilder editor runs on the back office, it's heavy because it loads a lot of data and files, which's predictable. Your customers don't use the editor, only you use the editor, Your customers view pages created by the easybuilder.
The easybuilder would be too large if we put all features in it. The structure is that one main module with several plugins, install plugins you need. The steasybuilder is the main module, the steasy_trans_panda is a plugin of the main module. We will create several more plugins for the main module in the future.
36. I've installed Panda theme, what would happen if I install the easybuilder?
- The first step is to upgrade your theme. For transformer theme users, upgrade your theme to v4.5.1 and later. For panda theme users, upgrade your theme to v2.6.1 and later.
- All contents created by Panda theme are safe, like banner images, text blocks, product sliders, etc. You can use the easybuilder to create new content. If you like you can re-create your site by using the easybuilder module, then you need to remove existing content, check #42
- The easybuilder module takes over the control of your theme, so the theme editor module will not be used anymore, but don't disable/uninstall it. Some color settings will disappear from the front office, no worry they are still in the theme editor module, you can go to the "BO > Improve > Easy builder > Easy builder settings" page to import them from the theme editor module to the easybuilder, so they will take effect on the front office again. Another way is to set those colors using the easybuilder module's theme editor panel.
If you get this error message when installing the steasybuilder module, click on the "What happened?" link to see if there are any error messages. Generally, try installing it again, the chance of the problem persisting is small, if it does persist, check these two php settings "upload_max_filesize" and "post_max_size", increase them to at least 16M, if you don't how to do that, you can contact your hosting company to increase them for you. Another way is manually install the module. Take these 3 steps: 1) Upload the steasybuilder.zip to the /modules/ folder via FTP. 2) Unzip the .zip file. 3) Find & install the module on the "BO > Module catalog" page. If you don't know to unzip it on the server, then you can unzip it on the local first, and then upload the steasybuilder folder to the /modules/ folder via FTP.
Don't forget that we are always here to help, contact us anytime, we will help you with the installation.
This may happen when you try to edit a category description, the reason is that in the theme editor module you set to not show the category description out. The same case would happen when you edit the brand description.
When you move a site into or out of a subdirectory, you need to use the "Path replacement tool" on the "BO > Improve > Easy builder > Easy builder settings" page to replace image urls, otherwise, images wouldn't show out on the front office, because image URLs in the database look like this: /sub1/img/cms/demo.jpg. You need to fill in the old path and the new path, here are some key points of how to fill them.
- Paths must contain /img/cms/ Because all images are loaded in the /img/cms/ folder.
- Paths must start and end with a /.
Here are some examples.
- Move a site from one subdirectory to another. Old path: /sub1/img/cms/ New path: /sub2/img/cms/
- Move a site from the root directory to a subdirectory. Old path: /img/cms/ New path: /sub1/img/cms/
- Move a site out to the root directory from a subdirectory. Old path: /sub1/img/cms/ New path: /img/cms/
Click here to tranlate the easybuilder module.
How to use the downloaded translation files? Let us the ru-RU.zip as an example.
- Unzip the ru-RU.zip, copy the .xlf file in it to the /app/Resources/translations/ru-RU/ folder.
- Clear the Smarty cache to make the file take effect.
Another way is to use the PrestaShop's translation system to transalte the easybuilder module.
- Select "Theme translations" + "Classic" in the "Modify translations" section on the "BO > International > Translations" page. NOTE Don't select "Installed modules translations" + "Easybuilder".
- Find "Modules > Easybuilder > Shop" on the left column to do translation.
Keep the "Force to use the legacy translation method" be off all the time, it's for people who can't use the above two ways.
All content will be fine when you move a site built with the easybuilder module, just keep in mind if you are going to move your site into or from a subdirectory, then you need to check #39.
We have a guide of how to move a PrestaShop site.
Upgrade your steasybuilder module to v1.0.6+, and then use the "Clean up" button in the "CLEAN UP EXISTING CONTENT" section on the "BO > Improve > Easy builder > Easy builder settings" page to remove all existing content. This "Clean up" button works best for new theme installations. For a customized site, you can still use it to remove most content. If a section, which you want to remove, is still there, you need find out which module it belongs to, which hook it's in, and then go to the module to disable it or unhook the module for the hook where it's located.If you want to keep existing content there, that's totally okay, they can still work perfectly fine.
We've not figured out a perfect solution for the feature of importing an entire page, here is the reason:
All settings of a page are from two parts: 1) Widgets. 2) Theme editor. With the easybuilder you can have as many pages as you want, but all pages share the same theme settings. That causes a problem when importing pages, for example, if you want to import the "Demo 1" as your homepage, import the "Demo 2" as a landing page, then theme editor settings from the "Demo 2" will overwrite the ones from the "Demo 1", which will make the homepage look different from the "Demo 1". If you don't import theme editor settings from "Demo 2", then the landing page will look different from the "Demo 2".So Easybuilder v1.0 doesn't have the feature to import a whole page, you can just import blocks. We will add the feature to import demo pages in the upcoming v1.1.
44. Install which file first.
You need to install 3 files, they are: the theme.zip in the main package, the steasybuilder.zip, and the steasy_trans_panda.zip. The order of installation doesn't matter, it's recommended to install the theme.zip first, and then the steasybuilder.zip and the steasy_trans_panda.zip. What matters is to install all of them, don't just install one or two.
The first step is to check the version of your theme, for transformer theme users, upgrade your theme to v4.5.1, and later, for panda theme users, upgrade your theme to v2.6.1 and later.
And then install the steasybuilder.zip and the steasy_trans_panda.zip, the order of installation doesn't matter, what matters is to install both of them, don't just install one of them.
Due to a bug in Firefox, if a section has an entrance animation, then the fixed background doesn't work for it.
Yes, two ways to do that.
- Put the development site in maintenance so you can use the easybuilder with out active it.
- Register the easybuilder module on the development site, when your site is ready, deactivate the development site in the easybuilder module or on the Downloads page, and then active the module on your production site again with the same license code on the production site.
Check this post https://github.com/elementor/elementor/issues/630. Two alternative solutions, 1) Setting some paddings to the element. 2) Adding a spacer widget to the element, and then set a height to the spacer.
The easybuilder will work even if the "Friendly URL" setting on the "Traffic & SEO" page is off, but we still recommend enabling the setting and keeping it be enabled all the time.
The maintenance page url looks like this by default https://easybuilder.sunnytoo.com/module/steasybuilder/maintenance
You can change it to https://easybuilder.sunnytoo.com/maintenance by setting a "Rewritten URL" for the "module-steasybuilder-maintenance" page on the "BO > Shop parameters > Traffic & SEO > SEO & URLs" page.
The default maintenance page will show out if you don't have a maintenance page created by the easybuilder module. Set the "Show on" setting to "Maintenance page" for a recode, then the record will be shown as a maintenance page.
Currently NO, but YES in the near future.
Transformer theme has 17+ demos, Panda theme has 20+ demos, they can be imported to your site by using the "One-click demo importer" tool in the theme editor module. But all of those demos were created using features of the Transformer theme and Panda theme, so it's not possible to customize them by using the easybuilder module. Since the easybuilder is easy-to-use, using it to builder a page is fast, so you can just create the demo you like using the easybuilder. We will re-create those demos using the easybuilder in the future, till then you can import them to your site in the easybuilder module.
If the "Enable Shop" is set to NO, then your site is already under the maintenance mode, the "maintenance mode" button not showing out doesn't matter. In order to have a "rich" maintenance page, rather than just a plain text page, the easybuilder modified the maintenance feature for a bit, which caused that button to disappear.
The language switcher switches the language of the preview window, that's all it does. Switching to "Espanol" in the language switcher doesn't mean that all content in the editor will be switched to Espanol. The "Language" field under the "Page settings" panel matters, check the #2 for more information about the multilanguage feature.


Clear the smarty cache to make changes take effect on the front office.
If the header of your site is created by the easybuilder and the megamenu module is under it, then you need to set the "z-index" filed for the "NavFullWidth" to 70.
a. Add font names to the "Custom fonts" filed under the "Fonts" block in the "Theme editor" panel, separate each font name by a comma (",").
b. Upload font files to a folder in the /upload folder via FTP, here we name the folder with "custom-font-a" as an example.
c. Add the @font-face declaration to the custom css code field which is under the "Custom codes" block. NOTE using absolute URLs to load font files, here is an example.
1 2 3 4 5 6 | @font-face { font-family: 'FontName'; src: url('//yourdomain/upload/custom-font-a/fontname.woff2') format('woff2'), url('//yourdomain/upload/custom-font-a/fontname.woff') format('woff'), url('//yourdomain/upload/custom-font-a/fontname.ttf') format('truetype'); } |
d. The final step is to refresh the current page to load the newly added fonts.
If you aren't sure what a setting will do, then set a value to see what happens on the privew window, that's total okay. Do remember once you decide not going to use the setting, then set it back to its default value. If it's empty then set it back to be empty, it's 0, then set back to be 0. The value for most of settings is empty, so if you don't remeber what's the default value, then it to be empty. Here is an example, the width of a column, it's default value is empty, if you set it to 0, then the column will be unvisiable, because it's width is 0, set it to be empty, the column's default width will be applied to make sure it's displayed out fine.
How to install and upgrade.
Easybuilder is composed of two modules, you will get both of them when you buy the easybuilder module.
- steasybuilder: This is the main module.
- steasy_trans_panda: This is a plugin of the steasybuilder module, it connects the Transformer theme and Panda theme with the easybuilder module, which makes the easybuilder be not only a page builder but also an editor of those themes, so you can do content building and theme editing in one place.
Both of them need to be installed, it doesn't matter which one you install first. Check #36 in the documentation section to know why there are two modules.
How to install?
Use the "Upload a module" button on the "BO > Modules" page to install the modules.
How to upgrade?
Use the "Upload a module" button on the "BO > Modules" page to upload the new version to your site, it's the same as how to install, don't worry all your data will be safe, PrestaShop will just upload updated files to your site, it won't do a reinstallation. Reload the "Modules" page to check if there is an "Upgrade" button, click on it if there's one.

Check #37 in the documentation section to if you have troubles installing the module.
NOTE If you've installed the js the composer module (Visual composer), then you've to uninstall it to install the easybuilder, because they don't compatible with each other. If you've installed revolution slider, then upgrade it to 5.4.7.5 or later to install the easybuilder module.
How to get support.

If you have any questions with this module, post them out on the Transfromer theme forum or Panda theme forum, we'll help you out.
Credits.
We bought all demo product images on Shutterstock under account helloleemj99, downloaded all banner images from unsplash.com.


Perfect!
UNA PASADA LLEVO SOÑANDO ESTE MOMENTO MUCHO TIEMPO 100 X 100 RECOMIENDANDO.
genial
Panda + Easy Buider give fantastic results. It's a real pleasure to build the shop so easily with a great professionnal design ! In addition, the support is really responsive and effective. Congrats.
It is a must buy if you have Transformer or Panda. It is what PrestaShop lacks to be able to create pages in a dynamic, fast, easy and beautiful way. It is simply Elementor transformed for PrestaShop and with added extras. With all the benefits of the SunnyToo templates included. Recommended purchase, excellent SunnyToo support, as always, and a very affordable annual renewal price.
Simply incredible. Thanks for creating this. I'm sure this module will change the way PS users do their websites, for good 😀 More than I was expecting, as always. I've worked with Panda & Transformer templates for years, and this Easy Builder is my favorite way of design and edit from now on. It has almost all elements centralized in 1 single panel. I was asking for this (centralizing and simplify) to PrestaShop through years. You ST finally did it. CONGRATULATIONS, great job!
Fantastic page builder, everything works well. Congrats.